Cozy Hot Cocoa Bar Recipe for Winter Nights
The Ultimate Hot Cocoa Bar Recipe for Cozy Gatherings
A hot cocoa bar isn’t just a drink setup—it’s an experience. It’s warm, inviting, customizable, and perfect for parties, holidays, family nights, or winter gatherings. If you want a setup that actually impresses people instead of looking like a random mix of ingredients thrown on a table, you need a proper plan, clear organization, and a recipe that works every single time. Here’s a fully detailed, no-nonsense guide to creating the perfect hot cocoa bar with the right ingredients, combinations, presentation techniques, and practical steps.
What Makes a Hot Cocoa Bar Special
A hot cocoa bar works because it lets guests build their own drink exactly how they like it. Unlike regular desserts, people can control sweetness, toppings, flavors, and presentation. It’s interactive, fun, and incredibly comforting on cold days. The smell of cocoa, chocolate, marshmallows, and spices instantly sets a mood that feels warm and festive.
Most people underestimate how memorable a well-organized cocoa bar can be. When you structure it right, guests won’t just take a drink—they’ll talk about it, take photos, and enjoy making combinations. That’s the difference between a basic setup and a professional-quality one.
Essential Ingredients for a Hot Cocoa Bar
Don’t try to overcomplicate things. A cocoa bar needs variety, but not too much. Focus on high-quality basics and a few smart options.
Hot Cocoa Base
Whether you want classic, creamy, or gourmet, choose one or two base recipes so you don’t overwhelm guests.
Options include:
• Classic hot cocoa (milk + cocoa powder + sugar)
• Rich hot chocolate (melted chocolate + cream)
• Instant cocoa packets (for fast setups)
• Sugar-free or vegan cocoa mix
Milk Options
Different people prefer different richness levels. Offer at least two.
• Whole milk
• Skim milk
• Almond milk
• Soy milk
• Oat milk
Sweeteners
Not everyone likes the same sweetness.
• Sugar
• Brown sugar
• Honey
• Maple syrup
• Stevia
Mix-Ins
These make the cocoa customizable.
• Cocoa powder
• Caramel sauce
• Chocolate syrup
• Peanut butter
• White chocolate chips
• Dark chocolate shavings
Toppings
This is where your cocoa bar stands out.
• Marshmallows (mini, regular, flavored)
• Whipped cream
• Crushed peppermint
• Cinnamon sticks
• Toffee bits
• Sprinkles
• Choco chips
• Cookie crumbs
Garnishes
These give the drink a polished finish.
• Orange zest
• Mint leaves
• Chocolate curls
• Dusting of cocoa powder
Tools and Equipment You Need
A cocoa bar collapses if you don’t plan the equipment properly. Here’s what you must have:
• Large insulated beverage dispenser
• Slow cooker or stovetop pot
• Heat-safe cups or mugs
• Spoons, stirrers, mixing sticks
• Small containers or jars for toppings
• Napkins
• Labels or small tags
• Tray or wooden board for neat presentation
Good equipment improves both usability and aesthetics.
How to Make the Perfect Hot Cocoa for Your Bar
You need a base recipe that’s rich, smooth, and reliable. This is the one you should use as your primary base.
Ingredients
• 4 cups whole milk
• 1 cup heavy cream
• ½ cup cocoa powder
• ¾ cup sugar
• 1 tsp vanilla extract
• Pinch of salt
• ½ cup semi-sweet chocolate chips
Instructions
Heat milk and cream over medium heat. Don’t boil. Add cocoa powder and sugar, whisking until fully dissolved. Add the chocolate chips and stir until melted. Finish with vanilla and a pinch of salt. Keep warm in a slow cooker or insulated container.
This base is creamy, rich, and strong enough to support toppings without becoming watery.
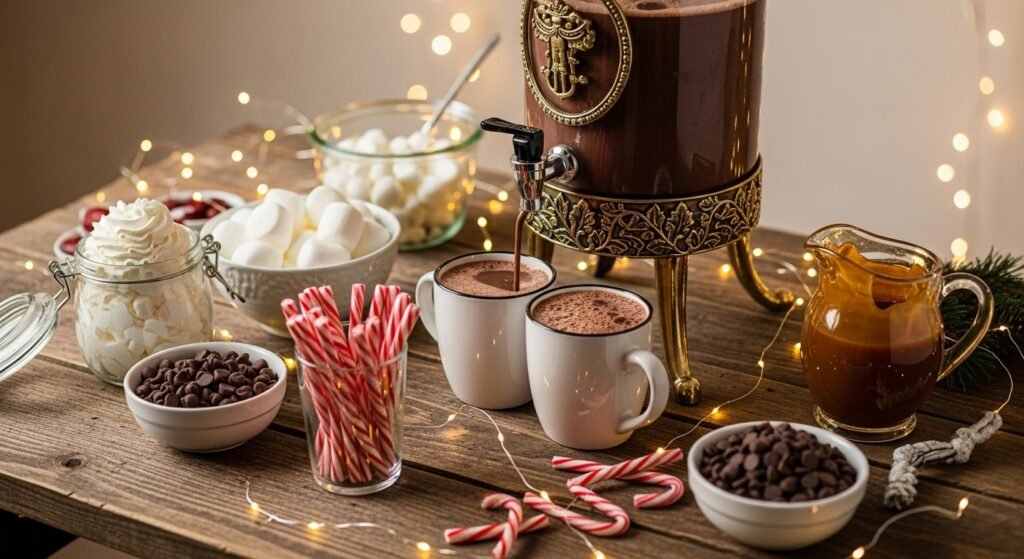
Setting Up Your Hot Cocoa Bar Step by Step
A lot of people throw ingredients together randomly and call it a cocoa bar. That’s lazy. Here’s how to set up a professional-looking bar that actually works.
Step 1: Choose Your Table Location
Pick a stable surface with enough space for layering everything. Corners or kitchen counters work best.
Step 2: Place the Hot Cocoa Dispenser
This goes in the center or slightly toward the back. It’s the main item, so it should be easy to reach but not blocking the toppings.
Step 3: Add Cups and Spoons
Place cups at one end and stirrers at the other. This creates natural flow.
Step 4: Arrange the Toppings
Use jars, bowls, or small glasses. Keep similar items close: sweets on one side, spices on the other.
Step 5: Add Labels
Small labels may seem unnecessary, but they make your station look organized and help guests choose faster.
Step 6: Add Garnish Area
Put whipped cream, marshmallows, and sauces together. These are your “finishing touches.”
Step 7: Add a Decor Element
A simple sign, fairy lights, cinnamon sticks, or pine cones instantly boost visual appeal.
Variations You Can Offer at Your Cocoa Bar
Not everyone wants plain hot cocoa. Offer simple variations without making your setup complicated.
Peppermint Hot Cocoa
Add peppermint extract and top with crushed candy canes.
Mexican Hot Chocolate
Add cinnamon and a tiny pinch of cayenne.
Salted Caramel Hot Cocoa
Mix caramel syrup into the cocoa and top with sea salt.
Mocha Cocoa
Add a shot of espresso for coffee lovers.
White Hot Chocolate
Use white chocolate instead of cocoa.
Tips for Keeping the Cocoa Bar Warm and Fresh
Nothing ruins a cocoa bar faster than lukewarm cocoa or soggy toppings. Keep everything fresh using these strategies:
• Keep the base warm using a slow cooker or insulated dispenser
• Stir occasionally to prevent separation
• Refill toppings before they run out
• Replace whipped cream if it collapses
• Keep cold toppings (like chocolate chips) in shaded areas
• Don’t put marshmallows near heat—they melt too fast
Proper maintenance makes your bar feel premium instead of messy.
How to Make Your Hot Cocoa Bar Look Aesthetic
Visual appeal matters. People love taking pictures of a beautiful cocoa bar.
Use Elevated Jars and Containers
Give different heights to toppings using small risers or stands.
Add a Themed Background
Holiday décor, winter patterns, or rustic boards work great.
Choose Color-Coordinated Items
Brown, cream, white, and red create classic cocoa aesthetics.
Use Warm Lighting
Soft fairy lights instantly increase the cozy factor.
Add a Handwritten Chalkboard Sign
It makes the whole setup look intentional and styled.
Hot Cocoa Bar for Parties, Holidays, and Events
You can adapt this cocoa bar to any event by customizing themes.
Christmas Theme
Use peppermint, gingerbread cookies, red sprinkles, and candy canes.
Winter Night Theme
Dark chocolate, marshmallows, and snowflake sprinkles.
Birthday Party
Bright toppings, flavored syrups, and colorful cups.
Kids’ Party
Mini marshmallows, rainbow sprinkles, chocolate milk base.
Romantic Setup
Add rose-shaped marshmallows, heart sprinkles, and soft lighting.
Common Mistakes to Avoid When Making a Cocoa Bar
Here’s where most people go wrong:
• Using low-quality cocoa mix
• Not providing enough variety
• Making the bar too cluttered
• Forgetting spoons or napkins
• Not labeling items
• Letting cocoa cool down
• Overloading the bar with unnecessary toppings
Avoid these mistakes and your setup will instantly look more polished.
How to Store Leftover Cocoa and Toppings
Storing leftovers properly saves money and keeps ingredients usable.
Store leftover cocoa
Refrigerate in an airtight container for up to 3 days. Reheat gently on the stove, not in the microwave.
Store toppings
Marshmallows and chocolates go in airtight jars. Syrups stay at room temperature. Cookies and crunchy toppings should be sealed to prevent softening.
Nutritional Information
A standard cup of hot cocoa contains:
• 180–250 calories
• 5–10g fat
• 20–30g sugar
• Small amounts of calcium and antioxidants
Adding toppings increases calories, so offer lighter options for health-conscious guests.
Final Tips for a Perfect Hot Cocoa Bar
• Keep things organized and easy to reach
• Stick to quality ingredients
• Don’t overload the table
• Offer at least one classic and one flavored base
• Refill items quickly
• Add small decorations for charm
A well-planned hot cocoa bar turns a simple drink into a memorable experience for anyone who visits.